How to Configure Static IP Address, Subnet Mask, Default Gateway, and DNS on Windows
If your network administrator or ISP has given you specific IP address, Subnet mask, Default gateway, and DNS server details, you need to configure them manually (static IP) instead of using DHCP. This is common in office networks, home labs, or when your router’s DHCP is disabled.
In this guide, we’ll use Windows 11/10 or Windows Server 2012, 2016, 2019, 2022, 2025 as the reference (steps are nearly identical on Windows 11). I’ll show you three methods:
- Graphical User Interface (easiest for beginners)
- Command Prompt (fast and scriptable)
- PowerShell (modern and powerful)
Important: Replace the example values below with your actual details:
- IP Address: 192.168.1.100
- Subnet Mask: 255.255.255.0
- Default Gateway: 192.168.1.1
- Preferred DNS: 8.8.8.8
- Alternate DNS: 8.8.4.4
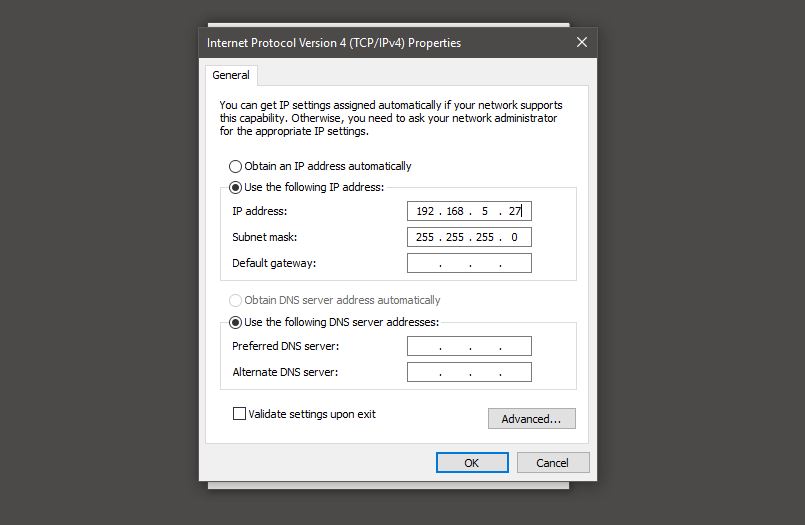
Method 1: Using Windows 10 GUI (Recommended for Beginners)
- Right-click the Start button → Network Connections (or press Win + R, type ncpa.cpl and press Enter).

- Right-click your active adapter (Ethernet or Wi-Fi) → Properties.
- Select Internet Protocol Version 4 (TCP/IPv4) → Properties.
- Choose Use the following IP address and fill in the details.
- Choose Use the following DNS server addresses and fill them in.
- Click OK → OK → Close.
Windows applies changes instantly. Open a browser and test internet.
Method 2: Using Command Prompt (CMD)
- Right-click Start → Command Prompt (Admin).
- Identify your adapter name:
netsh interface ipv4 show interfaces - Set IP, Subnet, and Gateway:
netsh interface ipv4 set address name="Ethernet" static 192.168.1.100 255.255.255.0 192.168.1.1 - Set DNS:
netsh interface ipv4 set dns name="Ethernet" static 8.8.8.8 primary netsh interface ipv4 add dns name="Ethernet" 8.8.4.4 index=2
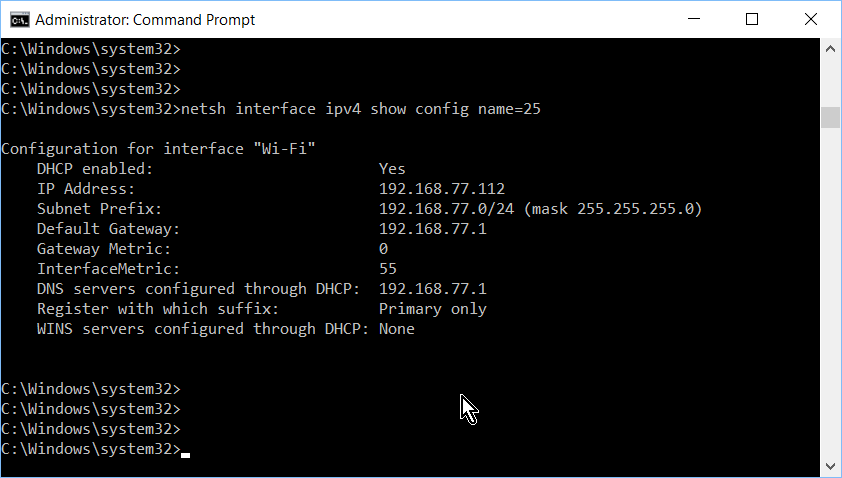
Show and Configure IPv4 on the Windows cmd Command Prompt with netsh (Set IP Address) – Networking – Spiceworks Community
- To Verify:
ipconfig /all
Method 3: Using PowerShell (Modern & Script-Friendly)
- Right-click Start → Windows PowerShell (Admin).
- Find your adapter:
Get-NetAdapter - Run this script (replace “Ethernet” if needed):
$Adapter = "Ethernet"Set-NetIPInterface -InterfaceAlias $Adapter -Dhcp DisabledNew-NetIPAddress -InterfaceAlias $Adapter -IPAddress 192.168.1.100 -PrefixLength 24 -DefaultGateway 192.168.1.1Set-DnsClientServerAddress -InterfaceAlias $Adapter -ServerAddresses ("8.8.8.8","8.8.4.4")

- To Verify:
ipconfig /all
How to Verify Everything Works
Run ipconfig /all — you should see your static IP, subnet, gateway, and DNS.

Then open a browser and visit google.com.
Common Troubleshooting Tips
- IP conflict? Ping the address from another device.
- Wrong adapter name? Use the commands above to check.
- No DNS? Try Google DNS (8.8.8.8 / 8.8.4.4).
- Restart PC/router if needed.
Conclusion
Configuring static network details on Windows 10 is quick and reliable with any of these methods. The GUI is beginner-friendly, while CMD and PowerShell are perfect for automation.
Save this guide — it’s a lifesaver for network admins and power users!
Got questions? Drop a comment below.
Happy networking! 🚀